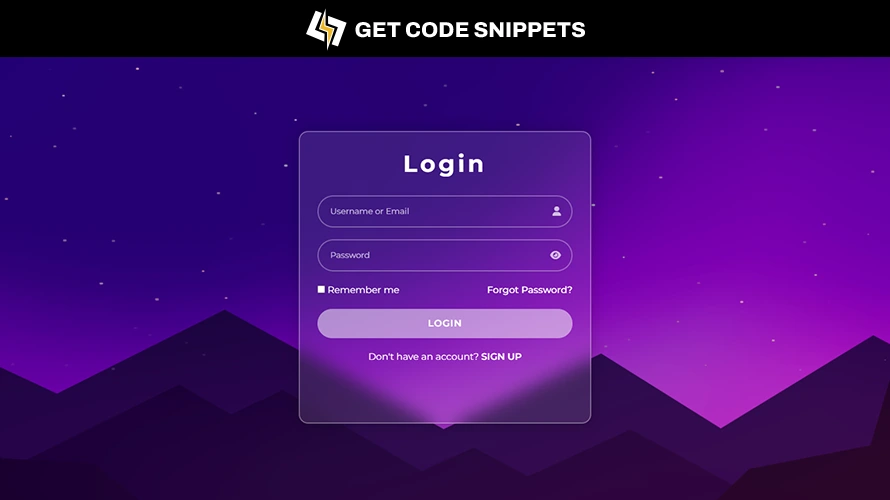
Hey everyone, welcome to this tutorial on creating a Login Form using HTML and CSS. In this tutorial, we will build a simple yet effective login form to enhance the user authentication experience on your website. This project is perfect for beginners who want to understand the basics of web development.
Login forms are essential for user authentication on websites. They provide a way for users to access restricted areas and personalize their experience. In this tutorial, we’ll break down the process of creating a login form using only HTML and CSS.
Let’s dive into the code to understand how it works and how each part contributes to the overall functionality of the form.
Project Folder Structure:
Before we start coding, let’s create the project folder structure.
- Create a project folder named “Login”.
- Inside the folder, add three files:
index.html,style.css. - Include an “img” folder for images within the project structure.
Step 1: Create the HTML Structure
Start by setting up the basic HTML structure. Create a form-wrap div to hold the individual elements for Username or Email & Password.
<!-- Code by Get Code Snippets - https://getcodesnippets.com/ -->
<!DOCTYPE html>
<html lang="en">

<head>
    <meta charset="UTF-8">
    <meta http-equiv="X-UA-Compatible" content="IE=edge">
    <meta name="viewport" content="width=device-width, initial-scale=1.0">
    <title>Login</title>
    <!-- Google Fonts -->
    <link rel="preconnect" href="https://fonts.googleapis.com">
    <link rel="preconnect" href="https://fonts.gstatic.com" crossorigin>
    <link href="https://fonts.googleapis.com/css2?family=Montserrat:ital,wght@0,100..900;1,100..900&display=swap"
        rel="stylesheet">

    <!-- Bootstrap CSS  -->
    <link rel="stylesheet" href="https://cdn.jsdelivr.net/npm/bootstrap@5.2.2/dist/css/bootstrap.min.css">

    <!-- CSS File  -->
    <link rel="stylesheet" href="style.css">

    <!-- Font Awesome 6 Icons  -->
    <link rel="stylesheet" href="https://cdnjs.cloudflare.com/ajax/libs/font-awesome/6.2.0/css/all.min.css" />
</head>

<body>

    <div class="form-wrap">
        <form action="">
            <h1>Login</h1>
            <div class="form-group">
                <input type="text" name="" id="" placeholder="Username or Email">
                <i class="fas fa-user"></i>
            </div>
            <div class="form-group">
                <input type="password" name="" id="" placeholder="Password">
                <i class="fa-solid fa-eye"></i>
            </div>
            <div class="forgot-pass">
                <label for="rememberMe">
                    <input type="checkbox" name="rememberMe" id="rememberMe">
                    Remember me
                </label>
                <a href="#">Forgot Password?</a>
            </div>
            <div class="login">
                <button type="submit">LOGIN</button>
            </div>
            <div class="sign-up">
                <p>Don't have an account? <a href="#">SIGN UP</a></p>
            </div>
        </form>
    </div>

</body>

</html>
Step 2: Style the Form with CSS
Next, add some basic styling to make the form visually appealing. You can customize the styles to fit your design needs.
/* Code by Get Code Snippets - https://getcodesnippets.com/  */

* {
  padding: 0;
  margin: 0;
  box-sizing: border-box;
  font-family: "Montserrat", sans-serif;
}
.form-wrap {
  min-height: 100vh;
  display: flex;
  align-items: center;
  justify-content: center;
  background-image: url(background.png);
  background-repeat: no-repeat;
  background-size: cover;
  position: relative;
}
.form-wrap::before {
  position: absolute;
  content: "";
  background: rgba(0 0 0 / 20%);
  width: 100%;
  height: 100%;
}
.form-wrap > form {
  position: relative;
  background: rgba(255 255 255 / 10%);
  backdrop-filter: blur(15px);
  min-width: 500px;
  min-height: 500px;
  padding: 30px;
  border-radius: 16px;
  text-align: center;
  border: 2px solid rgba(255 255 255 / 30%);
  box-shadow: 0 0 30px rgba(0 0 0 / 20%);
}
.form-wrap > form > h1 {
  color: #fff;
  font-weight: bold;
  letter-spacing: 5px;
  margin: 0 0 30px;
}
.form-wrap .form-group {
  position: relative;
  margin: 0 0 20px;
}
.form-wrap .form-group input {
  width: 100%;
  background: transparent;
  min-height: 55px;
  font-size: 14px;
  color: #fff;
  padding: 0 20px;
  border-radius: 50px;
  outline: unset;
  border: 2px solid rgba(255 255 255 / 30%);
}
.form-wrap .form-group input::placeholder {
  color: rgba(256 256 256 / 70%);
}
.form-wrap .form-group input:focus {
  box-shadow: 0 0 20px rgba(256 256 256 / 30%);
}
.form-wrap .form-group input:focus + i {
  color: #fff;
}
.form-wrap .form-group i {
  position: absolute;
  top: 0;
  bottom: 0;
  right: 20px;
  display: flex;
  align-items: center;
  justify-content: center;
  color: rgba(256 256 256 / 70%);
}
.form-wrap .forgot-pass {
  display: flex;
  align-items: center;
  justify-content: space-between;
}
.form-wrap .forgot-pass label {
  color: #fff;
  cursor: pointer;
}
.form-wrap .forgot-pass a {
  color: #fff;
  font-weight: 500;
  text-decoration: unset;
}
.form-wrap .login {
  margin: 20px 0;
}
.form-wrap .login button {
  width: 100%;
  background: rgba(256 256 256 / 50%);
  color: #fff;
  font-weight: 600;
  min-height: 50px;
  border: 0;
  border-radius: 50px;
  letter-spacing: 1px;
  transition: all 0.3s ease-in-out;
}
.form-wrap .login button:hover {
  background: #fff;
  color: #000;
}
.form-wrap .sign-up p {
  color: #fff;
}
.form-wrap .sign-up a {
  color: #fff;
  font-weight: 600;
  text-decoration: unset;
}
Conclusion
By following these steps, you’ve created a stylish Login form using HTML & CSS. This Login form can be customized further to fit any website’s design and purpose. Use it to enhance your web projects and engage your audience effectively.
Feel free to modify the code to suit your specific requirements and enhance the user experience on your website!
Happy coding!